A Developer's Guide to the Application Lifecycle iOS
A complete guide to the application lifecycle iOS developers need. Learn how to manage states, callbacks, and resources for robust, user-friendly apps.
The application lifecycle in iOS isn't just a technical concept—it's the fundamental rhythm every app follows, from the moment a user taps its icon to when it's swiped away. Getting this right is the difference between an app that feels smooth and intuitive and one that's a buggy, battery-draining mess.
Think of it like the stages of a play. The app takes the stage, performs for the audience, steps into the wings for a moment, and eventually takes its final bow. As a developer, your job is to direct your app's performance at every single one of these stages.
Your Roadmap to the iOS App Lifecycle
Every app on a user's iPhone or iPad operates within this strict, system-managed lifecycle. You don't get to decide when your app runs; iOS does. The operating system is the ultimate stage manager, telling your app when it has the user's full attention, when it needs to temporarily pause, and when it’s time to exit gracefully to save precious resources like battery life.
Our role is to listen for these cues from the system and respond accordingly. This is where we hook into the lifecycle to save user data, pause animations, and manage network connections, creating an experience that feels seamless and reliable.
Why Mastering the Lifecycle Matters
Nailing your app's state management isn't just about avoiding crashes—it's about being a good citizen on the user's device. When you get this right, the benefits are huge.
- Improved Performance: An app that pauses demanding tasks when it's not in the foreground feels snappier and more responsive.
- Enhanced Battery Life: Users notice when an app drains their battery. By stopping unnecessary processes, you keep them happy and their device running longer.
- A Seamless User Experience: Properly saving state means users can pick up right where they left off, whether they were interrupted by a phone call or just switched apps for a moment.
- Increased Stability: Gracefully handling interruptions and memory warnings is the key to building a robust app that users can depend on.
At the center of it all is the
UIApplicationDelegate. Think of it as your app's main liaison to the operating system. iOS sends notifications about every state change directly to this delegate, and by implementing its methods, you can run your own code at each critical moment. This is how you teach your app to behave perfectly in any situation, from launch to termination.
Understanding the Five States of an iOS App
To really get a handle on the application lifecycle in iOS, you need to know the distinct states an app can be in at any given moment. These aren't just technical terms; they map directly to what the user is doing and what iOS needs from your app. It's helpful to think of them as stages in a performance—your app is either offstage, waiting in the wings, front and center, or backstage wrapping things up.
The five core states determine everything from whether your app can run code to if it's even visible. Getting this right is crucial, especially now. When the iOS App Store launched back in 2008, there were only 500 apps. Today, you're competing with nearly 2 million, with thousands more landing every day. An app that works seamlessly with the iOS lifecycle—respecting the user's battery and device resources—is a hallmark of professional development. You can explore more app development statistics to see just how competitive it's gotten.
Let's walk through each state, one by one, with some real-world examples.
From Not Running to Active: The Launch Sequence
The journey starts the moment a user taps your app's icon. This is the big transition from Not Running—where your app is completely dormant—to becoming the main event on the screen.
- Not Running: Simple enough. Your app either hasn't been launched yet, or it was terminated by the user or the system. It's installed, but it’s not using any system resources.
- Inactive: This is a very brief, in-between state. Your app is running in the foreground, but it can't respond to user input. The classic example is when a phone call or a low-battery alert pops up. The user sees your app, but they can't touch anything until that interruption is gone.
- Active: This is showtime. Your app is fully on-screen, in the foreground, and responding to every tap, swipe, and keystroke. It's the state where your app is doing exactly what it was designed to do.
Think of the Inactive state as a "yellow light." The app is visible but temporarily on pause, waiting for the system to either give it the "green light" to become Active again or the "red light" to move into the background.
Going Off-Screen: Background and Suspended States
So what happens when the user hits the Home button or switches to another app? Your app isn't just killed off; it continues its lifecycle behind the scenes.
- Background: Your app is no longer on screen, but iOS gives it a small window of time to keep running code. This is your chance to finish up important tasks—like saving user progress, completing a file upload, or cleaning up resources before the system puts it to sleep.
- Suspended: After its short time in the background, your app enters the Suspended state. It’s kept in memory but can't execute any code. It’s essentially frozen in time, using very little power but ready to be brought back to life quickly if the user returns. If the system gets low on memory, it might quietly terminate suspended apps to free up resources, pushing them back to the Not Running state.
To pull all this together, here’s a quick reference table.
iOS App Lifecycle States at a Glance
This table provides a simple breakdown of the five states an iOS app can be in, what they mean, and what typically causes a state change.
| State | Description | Example Trigger |
|---|---|---|
| Not Running | The app is not launched or has been terminated. | The user hasn't opened the app yet. |
| Inactive | The app is in the foreground but not receiving events. | A system alert appears over the app. |
| Active | The app is in the foreground and is interactive. | The user is actively using the app. |
| Background | The app is off-screen but can still run code briefly. | The user switches to another application. |
| Suspended | The app is in memory but is not executing code. | iOS freezes a background app to save resources. |
Understanding these states is the first and most important step. Next, we’ll look at how your app's code can listen for and react to these changes.
Connecting States to Code with AppDelegate and SceneDelegate
Knowing the five states of the application lifecycle in iOS is one thing, but making your app react to them is where the real magic happens. This is how you build an app that feels responsive and reliable. The bridge between these lifecycle states and your actual code is built on two core components: AppDelegate and SceneDelegate.
Think of AppDelegate as your app's mission control. It's been part of iOS from the very beginning, handling the big, process-level events like the initial launch or the final shutdown of the entire application.
SceneDelegate, on the other hand, is the newer kid on the block, introduced with iOS 13 to handle the modern reality of multi-window apps on devices like the iPad. It manages the lifecycle of a specific UI instance, or a "scene," dealing with events like a particular window becoming active or getting sent to the background.
The Modern Division of Labor
Before iOS 13, AppDelegate was a jack-of-all-trades, juggling everything from app launch to UI state changes. Now, the responsibilities are cleanly split, leading to a much more organized and scalable architecture.
- AppDelegate: This is your go-to for process-level events. Its main job is to handle the initial application setup and respond to things that affect the app as a whole, like receiving a push notification when the app isn't in the foreground.
- SceneDelegate: This delegate is all about the UI. It handles what happens when a specific window's state changes, making it the perfect place for setting up your UI, restoring state, and saving user data tied to that scene.
This separation isn't just for show; it's essential for building apps that can handle complex user interactions, like running two instances of your app side-by-side.
The diagram below gives you a great visual of how an app flows through these different states.
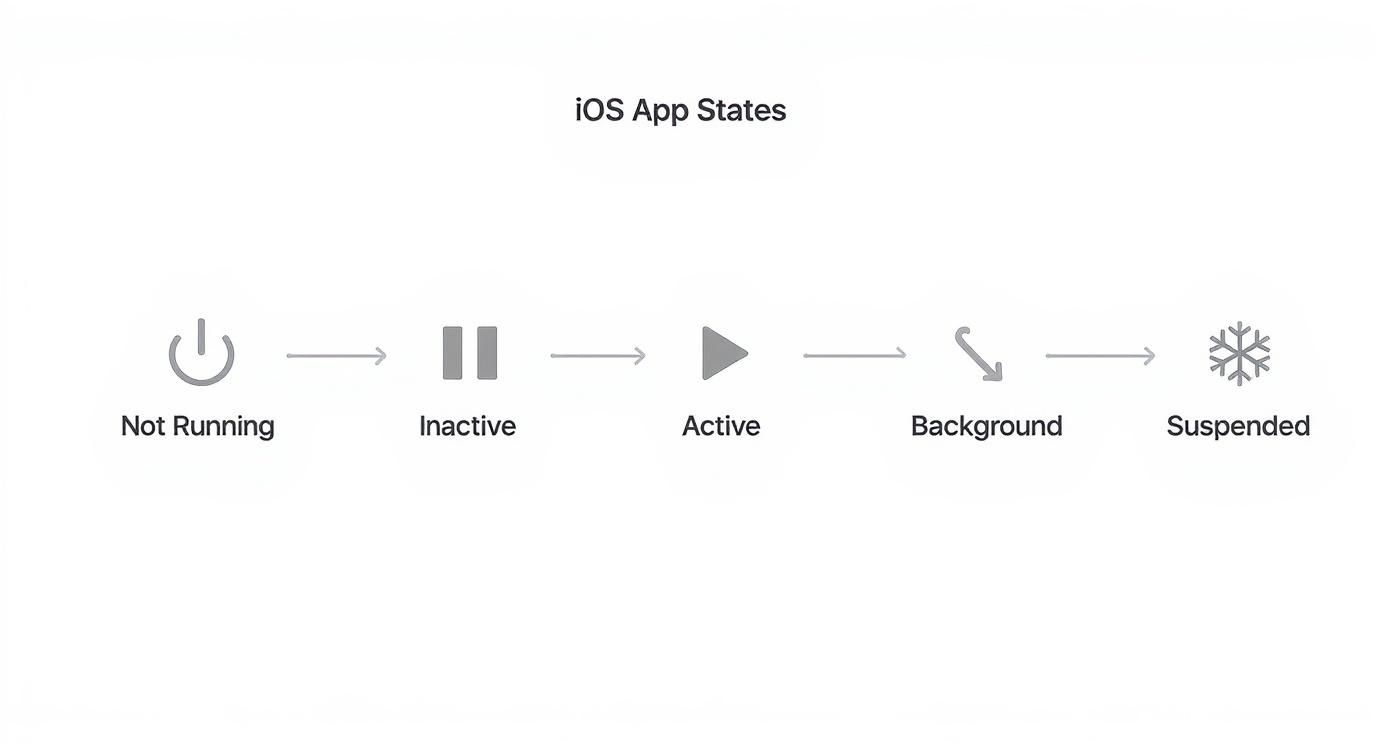
As you can see, it's a cycle. An app moves from active to the background and might come right back. Suspension is just the system's way of putting it into a deep sleep to save power.
Mapping States to Delegate Methods
Every time your app transitions from one state to another, iOS calls a specific method in one of these delegates. These methods are your hooks—your chance to jump in and run code at precisely the right moment.
Here are the most critical methods you'll be working with:
App Launch: When your app first boots up, the system calls
application(_:didFinishLaunchingWithOptions:)in yourAppDelegate. This method runs only once per launch, making it the perfect spot for one-time setup tasks. Think initializing third-party SDKs, configuring logging services, or setting up your database. For instance, our guide on how to integrate the iOS SDK shows how you'd kick off the Nuxie SDK right here.Scene Becomes Active: Whenever your app’s UI appears on screen,
sceneDidBecomeActive(_:)in theSceneDelegategets called. This happens both on initial launch and when a user switches back to your app. It's your signal to restart animations, refresh the user interface with new data, or resume any tasks you paused.Scene Enters Background: The moment a user swipes away from your app,
sceneDidEnterBackground(_:)is triggered. This is a critical window of opportunity. You have a very short amount of time to save user progress, stop demanding tasks, and free up memory. You have to be quick and efficient here before iOS decides to suspend your app entirely.
Key Takeaway: Always save critical user data in
sceneDidEnterBackground(_:). Don't wait forapplicationWillTerminate(_:). That termination method is a "best-effort" signal and is not guaranteed to be called, especially if the system is under memory pressure. Relying on it is a classic recipe for data loss.
Weaving Paywalls into Your App's Lifecycle

Understanding the application lifecycle in iOS goes way beyond just keeping your app from crashing. It's a genuine secret weapon for monetization. If you know exactly when to introduce your paywall, you can see a massive difference in your conversion rates.
Timing is everything. Show it too soon, and you risk scaring off new users before they've even tried your app. Wait too long, and you might miss that magic moment when they’ve just realized how valuable your app is.
By tapping into key lifecycle events, you can present your subscription offers when users are most likely to buy. This shifts the paywall from being an annoying interruption to a perfectly timed, relevant offer. Let's look at a few of the best moments to do this.
The First Launch Opportunity
One of the most common strategies is to show a paywall right at the first launch, typically triggered inside the application(_:didFinishLaunchingWithOptions:) method. It’s a direct approach that immediately lets users know about your premium features and business model.
- Pros: It’s simple to implement and sets clear expectations from the get-go. This can be great for capturing users who downloaded your app already planning to subscribe.
- Cons: This can come across as aggressive, especially for users who want to try before they buy. You might see a lot of people drop off immediately, which hurts your day-one retention numbers.
This tactic works best if you have a well-known brand or a utility app where the value is obvious right away.
Triggering on Return from the Background
A much subtler—and often more successful—strategy is to show the paywall when a user comes back to your app after using another one. The sceneWillEnterForeground(_:) method is perfect for this, as it fires every single time your app moves into the foreground.
This is a golden opportunity. The user liked your app enough to return, which signals real engagement. Presenting an offer at this point feels less like a demand and more like a "welcome back" gift.
Imagine a simple message: "Welcome back! Unlock all features with a 25% discount." It feels contextual and rewarding.
Pro Tip: Checking a user's subscription status has to be fast. To avoid a clunky UI delay when the app launches or returns, kick off that check asynchronously as early as you can. A great practice is to cache their status locally so the UI updates instantly while you fetch the latest info from your server in the background.
Post-Action and Intent-Driven Paywalls
Perhaps the most user-friendly approach of all is to display a paywall only after a user completes a key action or specifically tries to use a premium feature. This directly connects the value of the subscription to an action they just took.
For instance, they save their third project and get a prompt to unlock unlimited saves, or they tap a "Pro" feature and the paywall appears. If you're looking for different ways to build and present these kinds of offers, you can learn more about the core concepts of paywalls and how to integrate them.
When you master the application lifecycle in iOS, you can place paywalls with precision, respecting the user's journey. The goal is to sync up your monetization with the moments users are happiest and most engaged, turning those lifecycle events into real revenue.
Best Practices for Lifecycle Management

Knowing the theory behind the application lifecycle in iOS is one thing. Actually putting that knowledge into practice is what separates an amateur app from a truly professional one. A great app feels like a good guest on the user's device—it's respectful of system resources and provides a seamless experience.
When you get these habits right, your app feels polished and stable. It's not just about avoiding crashes; it's about being a good steward of the device's battery and memory, which has a direct line to user satisfaction and trust.
Smart Resource Management
Imagine your app is a guest in someone's home (their iPhone). When the host's attention turns elsewhere—sending your app to the background—it's good manners to tidy up. This is your app's chance to be a responsible citizen in the iOS ecosystem.
The moment sceneDidEnterBackground(_:) is called, your app needs to immediately halt any resource-heavy work. This is non-negotiable for a high-quality app.
- Cancel Network Calls: Active network requests are a major battery drain. If a download isn't absolutely critical, cancel it. You can always resume it when the user returns.
- Pause Animations and Timers: Let go of any
CADisplayLinkorTimerobjects. Animations running in the background are just wasting precious CPU cycles for no reason. - Release Large Memory Objects: Free up big chunks of memory, like image caches or hefty data models that you can easily rebuild later. This makes it far less likely that the system will terminate your app to reclaim memory.
Implement State Restoration
State restoration is one of the most powerful—and underrated—features you can build. It creates an almost magical experience where users can pick up exactly where they left off, even if iOS had to terminate your app in the background. It makes your app feel like it never stopped running.
State restoration basically tells the user, "I remember what you were doing." This small detail builds immense user confidence and makes your application feel incredibly reliable and intuitive, transforming a potentially jarring interruption into a seamless continuation.
Getting state restoration right is a true sign of a mature application lifecycle iOS strategy.
Handle Background Tasks Gracefully
Sometimes, you really do need a few extra seconds to finish something important after the user has left, like saving a complex document or finishing an upload. iOS gives you a way to ask for a little more time.
But this is a privilege, not a right. You have to explicitly request background time and then end the task as quickly as you possibly can. If you take too long, the system will simply terminate your app. For more complex background needs, our guide on comprehensive app testing for iOS can help you properly validate this behavior.
These practices aren't just technical details; they're critical for keeping users around. Retention is one of the biggest challenges on the App Store, where apps typically keep only 23.9% of users after the first day. That number drops to a painful 3.7% by day thirty. A smooth, reliable experience is your best defense against users hitting the delete button. You can discover more insights about user retention challenges here.
Common Questions About the iOS App Lifecycle
Even after you've got the hang of the states and delegate methods, some parts of the iOS application lifecycle can still throw you for a loop. Let's tackle some of the most common questions developers run into, helping you sidestep those frequent pitfalls.
Think of this as your go-to cheat sheet for clearing up tricky concepts and solving real-world coding problems. We'll sort out who does what between the delegates and pinpoint exactly which methods to use for those can't-fail tasks.
What Is the Main Difference Between AppDelegate and SceneDelegate?
It helps to think of AppDelegate as the CEO of your entire application. It's responsible for the big-picture stuff that affects the whole app, like the initial launch sequence and the final shutdown process. For the entire life of your app, AppDelegate is the single point of contact for process-level events.
SceneDelegate, on the other hand, is a newer player introduced in iOS 13 to handle multi-window support. It acts more like a window manager for a specific piece of your app's UI, or a "scene." It's in charge of the lifecycle for its particular window—things like when it becomes the active window, when it gets sent to the background, or when it comes back.
How Do I Save Data When the App Is About to Close?
The best, most reliable place to save your user's critical data is inside the sceneDidEnterBackground(_:) method in your SceneDelegate. This is your last guaranteed chance to run any code before iOS decides to either suspend or completely terminate your app.
A word of warning: Don't ever count on
applicationWillTerminate(_:)for saving important data. This method isn't called in a lot of common scenarios, like when the system kills a suspended app to reclaim memory. Relying on it is a classic recipe for data loss.
Can My App Run Forever in the Background?
Nope, not usually. A standard iOS app gets a very short amount of time to continue running code after the user sends it to the background. Once that brief window closes, the system shunts the app into the suspended state, where it's frozen and can't run any code at all.
However, iOS does provide a way out for specific use cases. You can declare support for certain background modes to perform long-running tasks. These are special permissions reserved for things like:
- Playing audio
- Tracking location for navigation apps
- Fetching fresh content from a server
- Handling Voice over IP (VoIP) calls
To use these, you have to explicitly ask for permission and justify their use to Apple during the App Store review.
What Is the Difference Between Inactive and Background States?
It's easy to mix these two up, but they serve very different purposes.
The Inactive state is a quick, temporary phase. Your app is still on-screen and in the foreground, but it isn't receiving any touch events from the user. This happens when a system interruption appears, like an incoming phone call banner or a Siri prompt.
The Background state is when your app is completely off-screen. It might get a few moments to finish up what it was doing, but its ultimate destination is the suspended state.
Ready to turn lifecycle events into revenue? Nuxie lets you design, target, and launch high-converting paywalls at the perfect moment, all without shipping a new app update. Get started for free at Nuxie.io.