Define Restore Purchase A Guide for iOS Apps
Clearly define restore purchase and learn why it's a critical feature for iOS apps. Our guide covers implementation, common pitfalls, and best practices.
Ever bought an app's premium features, then switched to a new iPhone only to find those features gone? That's the exact problem the "Restore Purchase" button solves.
It’s essentially a critical safety net for users. It lets them get back all their previous in-app purchases—like subscriptions or one-time unlocks—without ever having to pay a second time. If a user deletes and reinstalls your app or logs in on a new device, this feature ensures they don't lose what they've already paid for.
What "Restore Purchase" Really Means for Your Users
Think of the "Restore Purchase" button as a universal key tied to a user's Apple ID. Let's say someone buys the "Pro Version" of your app on their old iPhone. A year later, they get the latest model and download your app again. Without a restore option, the app would treat them like a brand-new user, completely unaware of their previous purchase.

When they tap that button, your app sends a secure request to Apple, essentially asking, "Hey, has this person's Apple ID ever bought our premium stuff?" Apple's servers check their transaction history and give your app the green light. The app then immediately unlocks the content the user already owns.
The best part? It all happens seamlessly in the background. No re-entering credit card details, no accidental double charges, and no frustrated users.
Key Takeaway: A "Restore Purchase" button isn't just a nice-to-have feature; it's a fundamental requirement under Apple's App Store guidelines for certain purchase types. It builds trust and shows users their investment in your app is safe, no matter what device they're using.
Which Purchases Need a Restore Button?
So, do you need to add this for every in-app purchase? Nope. It all comes down to what you're selling. The requirement is based on whether the item is meant to be permanent or gets used up. According to recent online purchase trends, users increasingly expect their digital goods to follow them across devices, making this feature more important than ever.
Here's a quick look at how Apple categorizes in-app purchases and whether they need a restore button.
In-App Purchase Types and Restore Requirements
This table provides a quick summary of which in-app purchase types require a restore mechanism and which do not.
| Purchase Type | Description | Restore Purchase Required |
|---|---|---|
| Non-Consumable | A one-time purchase that unlocks permanent features, like "Remove Ads" or a "Pro Version." | Yes |
| Auto-Renewing Subscription | Ongoing access to content or services, such as a monthly magazine or a streaming app. | Yes |
| Non-Renewing Subscription | Time-limited access that doesn't automatically renew, like a one-month season pass. | Yes |
| Consumable | An item that is used up and can be purchased again, like in-game currency or extra lives. | No |
Ultimately, for any purchase that grants a user ongoing or permanent access to content, you must provide a way for them to restore it. Consumables are the only exception, as they are designed to be bought and used up.
Why a Good Restore Purchase Flow is Great for Business
Ever downloaded an app you paid for, switched to a new phone, and found all your premium features gone? It’s incredibly frustrating. A missing or broken restore button is one of the quickest ways to earn a one-star review on the App Store and a flood of angry support tickets.
Getting this right isn't just about ticking a box for Apple's guidelines; it's a smart business decision that builds trust and directly protects your revenue. When people feel confident their purchases are safe and portable, they're far more willing to spend money in your app.

Think of it this way: the restore button tells your users that what they bought has real, lasting value. This sense of security is vital, especially when research shows that around 91% of shoppers demand value for their money and a frictionless experience. A simple button can make all the difference.
The Financial Upside of a Seamless Restore Experience
A reliable restore process does more than just keep users happy—it actively saves you money and secures your income.
Here’s a breakdown of the business impact:
- Slashes Support Costs: A clear, working restore button is a user's first line of defense. It empowers them to solve their own problem, which means fewer support emails for your team to handle.
- Eliminates Accidental Re-buys: It prevents frustrated users from buying the same non-consumable item twice, which almost always leads to refund requests and chargebacks that eat into your profits.
- Stabilizes Subscription Revenue: For apps with recurring revenue, this is absolutely critical. A subscriber who gets a new iPhone needs their access to seamlessly carry over. If it doesn't, you risk losing them for good.
By making it effortless for users to reclaim what they've paid for, you create a foundation of trust. That trust is the bedrock of sustainable growth and long-term financial success.
Building this kind of dependable experience is a core part of a healthy app business. To learn more about how small features like this fit into the bigger picture, check out our guide on maximizing revenue from apps.
How StoreKit Powers the Restore Purchase Process
When a user taps that "Restore Purchase" button, it might seem like a simple action, but there’s a lot going on under the hood, all orchestrated by Apple’s StoreKit framework. Think of StoreKit as the trusted intermediary between your app and the App Store. It handles all the sensitive back-and-forth needed to confirm a user's purchase history, so your app never has to deal with passwords or credit card numbers.
The whole process hinges on the user's Apple ID. Your app doesn't need to ask for credentials; it just tells StoreKit to make a request. Apple's servers then cross-reference that Apple ID's purchase records to find anything they bought in your app. It’s a beautifully secure and privacy-conscious system.
At its core, the whole thing kicks off with a single function call. Tapping the restore button triggers your app to run restoreCompletedTransactions(). This command essentially asks StoreKit to go find all non-consumable items, auto-renewing subscriptions, and non-renewing subscriptions that the user has ever paid for.
The Transaction Queue and Unlocking Content
After your app makes that call, the App Store gets to work. It finds all the matching purchases and sends them back to your app, adding them one by one to a payment queue. Your app’s job is to listen for these transactions as they arrive, verify each one is legitimate, and then unlock the right features or content for the user. It’s a clean, step-by-step process.
This infographic breaks down the workflow into three simple stages.
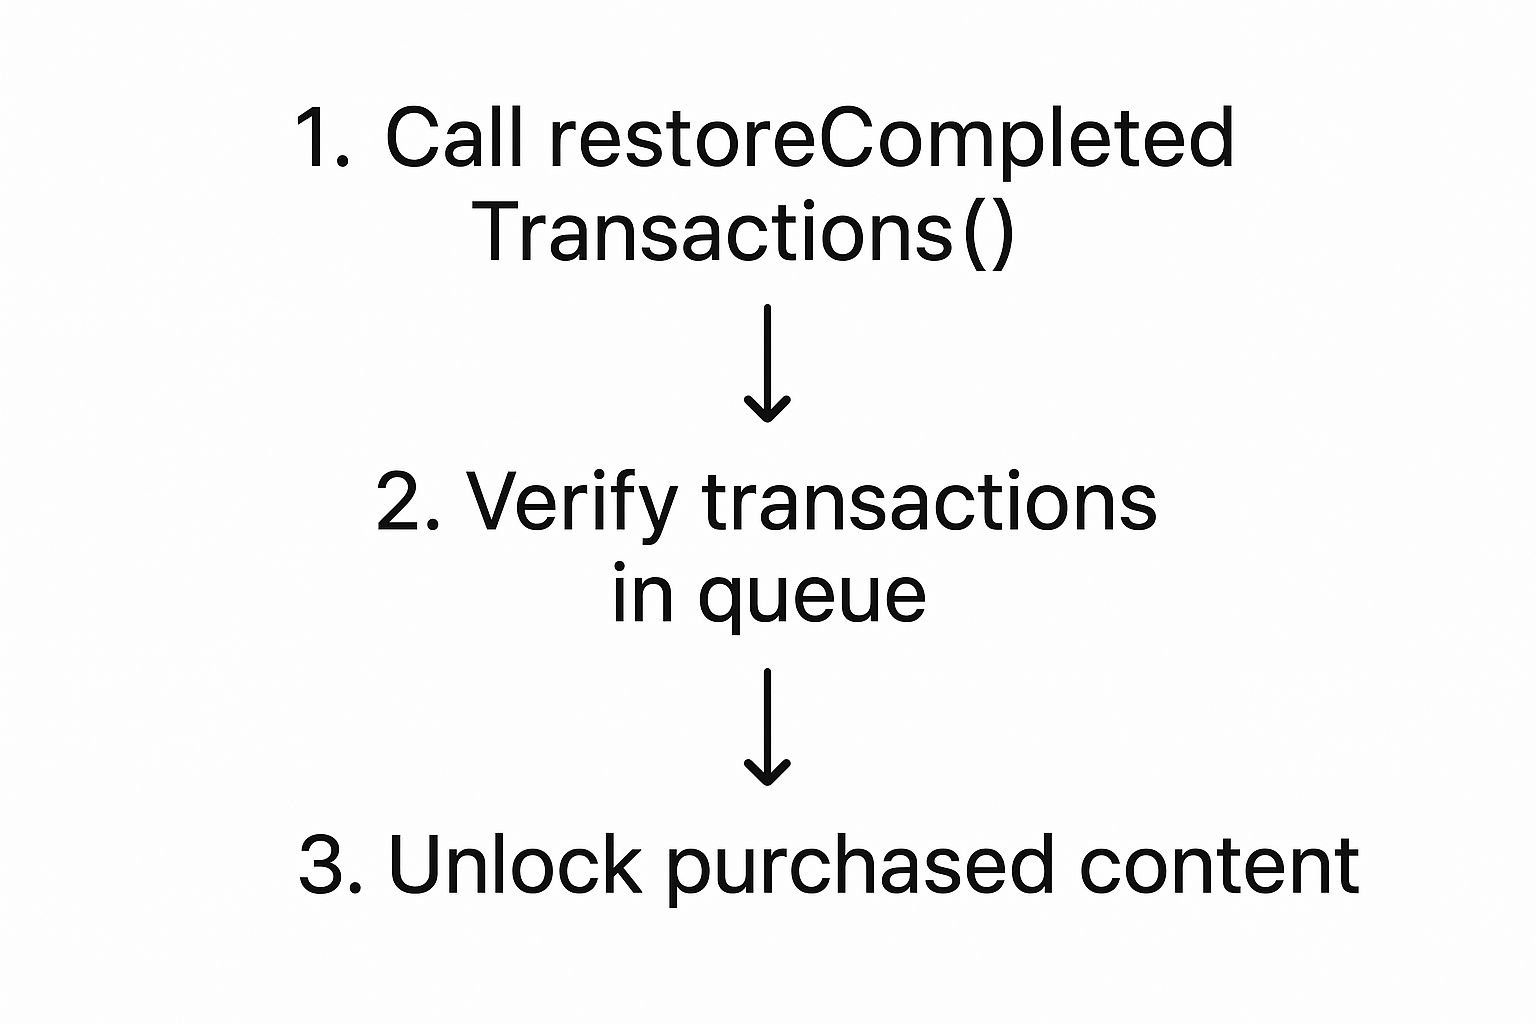
As you can see, the initial request starts a secure check with Apple, which then populates a queue for your app to process. Getting each of these steps right is crucial for creating a reliable restore experience that your users can count on.
Of course, you don’t have to build all of this from scratch. SDKs can handle a lot of the heavy lifting and boilerplate code. If you’re looking for a modern, Swift-based solution, the Nuxie iOS SDK documentation is a great place to see how these StoreKit interactions can be simplified.
A Step-by-Step Guide to Implementation
Okay, let's get our hands dirty. Turning the idea of restoring purchases into a real, working feature isn't complicated, but it does require following a clear path. Here’s a walkthrough of how to build a solid restore flow for your iOS app using Swift and StoreKit.
First things first: the button. You need a simple, obvious way for users to kick off this process. A button with the text "Restore Purchases" is the universal standard. Where you put it matters. It should be easy to find—think your paywall screen (often near the "buy" button) or inside the app's settings—but not so front-and-center that it steals attention from your main calls to action.
With the button in place, it's time to wire it up to do the actual work. This is where StoreKit comes in.
Kicking Off the Restore Process
When a user taps that button, your app needs to make a single, crucial call: SKPaymentQueue.default().restoreCompletedTransactions(). This one line of code is your app's way of asking the App Store, "Hey, can you check this user's purchase history for anything they've bought from me before?"
Because this involves talking to Apple's servers, it's not instantaneous. The process is asynchronous, meaning your app fires off the request and then waits for the response. To catch that response, your app needs to be listening for transaction updates.
Here’s a breakdown of the core logic:
- Set Up a Listener: Your app needs an observer object that conforms to the
SKPaymentTransactionObserverprotocol. This is how it listens for events from StoreKit. - User Taps Restore: This triggers the
restoreCompletedTransactions()method we just mentioned. - Process Incoming Transactions: If the App Store finds any previous non-consumable purchases, it adds them to the payment queue. For each one, your observer's
paymentQueue(_:updatedTransactions:)method gets called with a transaction state of.restored. - Unlock the Goods: Inside that method, you'll check the product identifier for each restored transaction and unlock the features or content the user is entitled to.
- Finish the Transaction: This is a step people often forget. For every single restored transaction you handle, you must call
SKPaymentQueue.default().finishTransaction(transaction). This tells StoreKit you're done with it and removes it from the queue, so you don't process it over and over again.
Crucial Tip: Never leave your user hanging. The moment they tap "Restore," show a loading spinner. When the process is done, replace it with a clear success or failure message. Providing instant visual feedback makes the experience feel professional and trustworthy.
Handling All the Outcomes
Things don't always go according to one perfect script. A robust implementation needs to gracefully handle every possible scenario.
- Success! If purchases are found, unlock the content and show a friendly confirmation message. Something like, "Your purchases have been successfully restored!" works perfectly.
- Nothing to Restore: If the process finishes without finding any transactions, it just means the user hasn't bought anything with that Apple ID. Let them know with a clear message, like "No previous purchases were found." This prevents confusion.
- Something Went Wrong: On rare occasions, the restore might fail due to a bad network connection or some other server error. In this case, StoreKit calls the
paymentQueue(_:restoreCompletedTransactionsFailedWithError:)delegate method. You need to catch this and tell the user the process couldn't be completed, maybe suggesting they try again later.
If you're looking for more in-depth examples and best practices, our guide on how to allow in-app purchase restoration can help fill in the gaps. Getting this right is about more than just code—it’s about building a user journey that feels fair and reliable.
Common Mistakes to Avoid When Adding a Restore Purchase Button
Putting a "Restore Purchase" button in your app isn't just a box to check. Get it wrong, and you'll create more headaches for your users—and your support team—than if you'd left it out entirely. A little thoughtful implementation goes a long way.
One of the most common stumbles is burying the restore button deep inside a settings menu. Think about it from the user's perspective: they just got a new phone or reinstalled your app, they hit the paywall, and now they can't find how to get back what they already paid for. It's an instant trust-killer.

Another critical error? Silence. When a user taps "Restore," the app can't just sit there. Without a loading indicator or some kind of feedback, it feels broken. They'll probably tap it again and again, getting more frustrated by the second, before finally giving up.
The whole point is to build confidence. From the moment they tap the button to the final confirmation, the restore process should feel obvious, transparent, and completely reliable.
Sidestepping Common Implementation Traps
So much can go wrong when you don't test thoroughly in Apple's sandbox environment. What happens if a brand new user with no purchases tries to restore? Or if someone's subscription has lapsed? What if their Wi-Fi cuts out mid-process? A single overlooked scenario can break the experience for thousands of people.
To get this right, you have to anticipate what your users will do and what might go wrong. Getting a handle on these common missteps is the first step toward a flawless implementation.
Implementation Pitfalls and Best Practices
Here's a quick look at the most frequent mistakes developers make and how you can sidestep them.
| Common Mistake | Why It's a Problem | The Correct Approach |
|---|---|---|
| Hiding the Button | Users get frustrated and leave bad reviews because they can't find it. | Make it obvious. Place a "Restore Purchase" link on the paywall and in the main settings menu. |
| No User Feedback | The app feels frozen or broken, leading users to abandon the process. | Always show a loading spinner immediately. Follow up with clear "Success!" or "No Purchases Found" messages. |
| Ignoring Edge Cases | The app crashes or behaves unexpectedly for users in different situations. | Use the sandbox to test everything: users with no purchases, network errors, and various subscription states. |
Nailing these details makes a world of difference. It shows users you've thought through their experience, which is key to keeping them happy and subscribed.
Answering Your Top Questions About Restoring Purchases
Even with a flawless setup, a few common questions always seem to pop up around the restore purchase process. Let's walk through the most frequent ones to clear up any confusion and help you handle those edge cases like a pro.
At the end of the day, remember that the user's Apple ID is the single source of truth for their purchase history. This simple fact is what makes the whole system work so smoothly for both you and your users.
Do I Need an In-App Account to Restore Purchases?
For the most part, no. The entire restore mechanism is built to work with the user's Apple ID, not some separate account they create inside your app. When a user taps "Restore," your app is essentially just asking the App Store, "Hey, what has this Apple ID bought from me before?" It's a direct and secure lookup of Apple's records.
Now, things change a bit if you manage access to features on your own server. In that scenario, you'll still use the Apple ID to confirm the purchase, but you'll also need a way to link that purchase to a user's account in your own database. The Apple ID verifies the transaction, and your server grants the permission.
The restore flow verifies ownership via the Apple ID. How you grant access after that verification depends on whether you use on-device flags or a server-side entitlement system.
What Happens if a User Hasn't Bought Anything?
This is a super common scenario, so your app needs to handle it gracefully. If a user with no purchase history hits the "Restore" button, StoreKit will simply come back empty-handed—no transactions to report.
Your job is to catch this empty response and show a friendly, clear message.
- Good Example: "No previous purchases were found for this Apple ID."
- Bad Example: "An error occurred." or worse, just doing nothing at all.
A simple, informative message reassures the user that everything is working correctly and prevents them from thinking your app is broken. It's a small detail that makes a big difference in user trust.
Do I Need a Restore Button for Consumables?
Definitely not. In fact, you shouldn't have one for them. Apple's official guidelines are very clear: the restore mechanism is required only for non-consumable products and auto-renewing subscriptions.
Think of it this way: consumables, like a pack of in-game coins or a one-time power-up, are meant to be used and depleted. They aren't permanent, so there's nothing to restore. Trying to restore them would just confuse your users and clutter the experience.
Juggling the complexities of in-app purchases, from paywall design to restoration logic, can pull you away from what you do best: building a great app. With Nuxie, you can design, target, and launch high-converting paywalls in minutes, no app updates required. Our AI-powered studio and visual campaign builder make it easy to fine-tune your revenue strategy. Learn more at https://nuxie.io.