How to Launch an App from Idea to Success
Learn how to launch an app with our definitive guide. We cover everything from market validation and development to marketing and post-launch growth.
A successful app launch doesn't start with the first line of code. It starts with a validated idea, a crystal-clear picture of your target audience, and a rock-solid monetization strategy. This groundwork is what separates the apps that take off from those that just fade away.
Building a Bulletproof App Foundation
That "aha!" moment for a new app idea is electric, but inspiration alone won't get you to the finish line. I've seen countless developers dive headfirst into building, only to surface months later with a perfectly coded app that nobody actually wants or is willing to pay for.
The most critical part of any app launch is what happens before you even think about development. You need to shift your thinking from "Can I build this?" to a much tougher question: "Should I build this?" Answering that involves digging into research, getting honest feedback, and truly understanding the people you want to help. If you skip this, you're not building a business—you're funding a hobby.
Uncover Genuine User Needs with Market Research
Your first move isn't to see what other apps are doing. It's to find a real problem that people are desperate to solve. Good market research is more than a quick scroll through the App Store's top charts; it's about becoming an expert in your future users' biggest headaches.
Start by narrowing your focus. Instead of a generic "fitness app," get specific—think "a HIIT workout app for busy parents who have minimal equipment at home." A tight niche like this makes it infinitely easier to find and connect with your audience.
- Become a Review Detective: Scour the 1-star and 5-star reviews of competing apps. The bad reviews are a goldmine of frustrations and missing features, while the glowing ones tell you exactly what people love and value.
- Hang Out Where Your Audience Lives: Dive into Reddit subs, Facebook groups, and niche online forums where your target users gather. Just listen. Pay attention to their conversations, the problems they complain about, and the language they use.
- Ask Smart Questions: Use a simple tool like Google Forms to run quick surveys. But here's the key: focus on problems, not your proposed solution. Instead of asking, "Would you use an app that did X?" ask, "What's the most frustrating part of planning your weekly workouts?"
This process is all about making sure you’re building a painkiller, not just a vitamin.
Define Your Unique Value Proposition
Once you've got a handle on the problem, you need to be able to explain, in a single sentence, why your app is the only solution. This is your unique value proposition (UVP). It’s a clear, concise statement that tells people the benefit you offer, who you're for, and what makes you different. A powerful UVP makes choosing your app a no-brainer for the right person.
A classic mistake is to define your app by its features. Don't. Define it by the outcome it delivers. Nobody wants "a calendar with integration"; they want to "never miss an important family event again."
The infographic below really nails this foundational process, showing how you move from initial research to carving out your own space in the market and proving your concept is solid.
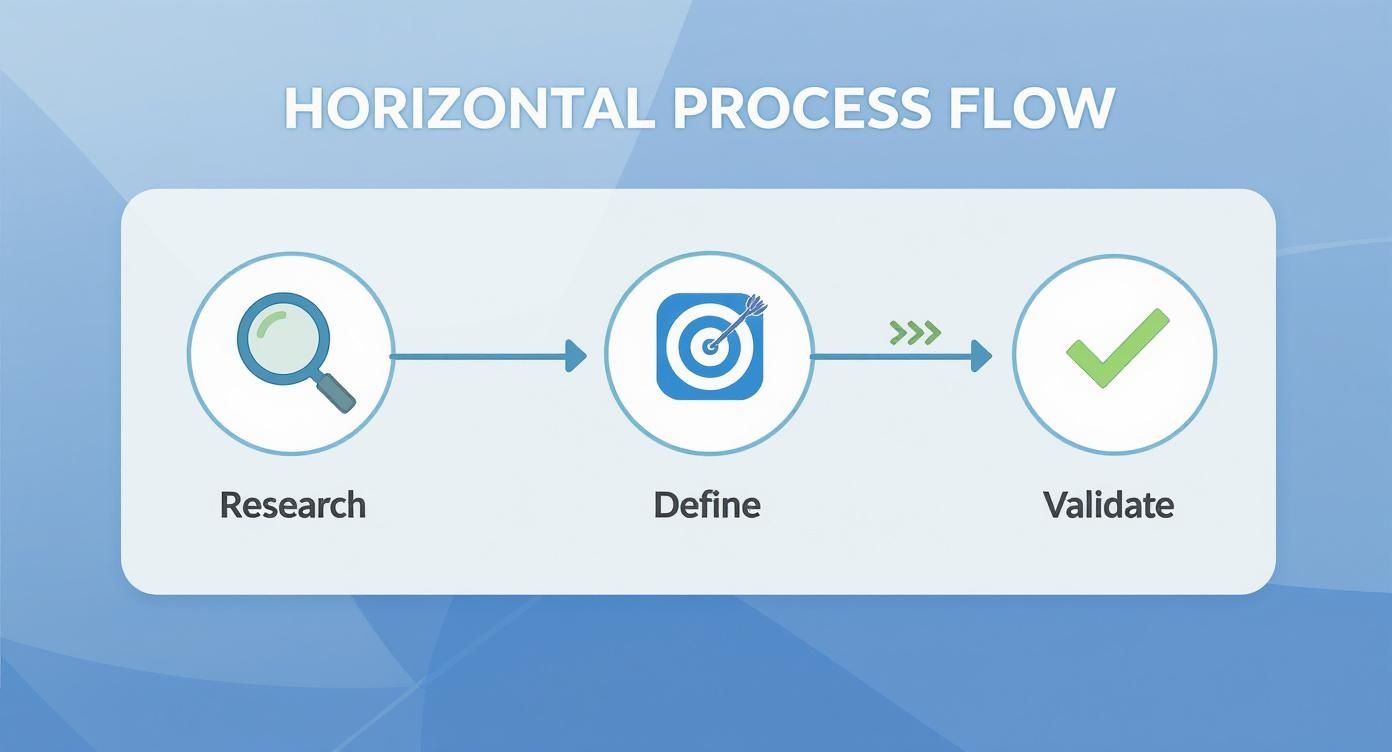
See how each step builds on the last? That's how you create a strong, market-ready app concept before a single developer gets involved.
Choose Your Monetization Model Early
Figuring out how your app will make money isn't something you tack on at the end. It's a decision that will fundamentally shape your app’s design, user experience, and even your marketing. Let's be real: revenue is critical. The financial potential is massive, with global mobile app revenue projected to soar to between $530 billion and $585 billion by 2025, largely thanks to subscriptions, in-app purchases, and ads. In fact, subscription models are a powerhouse, making up nearly 40% of all app revenue.
Before you go any further, lay out your strategy. The following table breaks down the key strategic actions to take well before development kicks off.
Pre-Launch Strategy Checklist
| Phase | Key Action | Primary Goal |
|---|---|---|
| Research | Identify a specific niche and analyze competitor reviews and online communities. | Uncover a genuine user problem and understand existing frustrations. |
| Validation | Conduct surveys and interviews focused on the problem, not the solution. | Confirm that the target audience is actively seeking a solution and willing to pay. |
| Positioning | Craft a clear Unique Value Proposition (UVP) based on the user outcome. | Differentiate the app from competitors and clearly communicate its core benefit. |
| Monetization | Select a revenue model (Freemium, Subscription, Paid, etc.) that aligns with user value. | Integrate the business model into the core app experience from day one. |
Completing these steps gives you a clear roadmap and ensures every decision you make from here on out is aligned with a viable business plan.
Some of the most common monetization models you'll see are:
- Freemium: The basic app is free, but users can pay to unlock premium features.
- Paid Upfront: A classic model where users pay one time to download the app.
- Subscription: Users pay a recurring monthly or annual fee for ongoing access.
- In-App Purchases: Perfect for games or service apps where users buy digital goods or credits.
Your choice here has to make sense for the value you're providing. A content-heavy app is a natural fit for a subscription, while a game can do incredibly well with in-app purchases. Nailing this down early allows you to design a user journey that naturally leads toward your revenue goals.
For a more comprehensive look at the entire journey, from idea to App Store, check out our guide on how to get an app made.
Bringing Your App to Life: Development and Testing
Alright, your idea is solid and you've confirmed people actually want it. Now for the exciting part: building the thing. This is where your plans and sketches start turning into a real, functional product that people can actually use. It’s easy to get carried away and try to build every feature you’ve ever dreamed of, but the secret to a successful start is focus.
Your primary goal right now is to build a Minimum Viable Product (MVP). Let's be clear: an MVP isn't a half-baked or buggy app. It's the leanest, most focused version of your product that solves the one core problem for your target audience. Think of it as the absolute essential feature set that proves your app's value. Launching with an MVP gets you into the market fast, letting you collect real-world feedback instead of guessing what users want.
This approach saves you from "feature creep"—that classic mistake of cramming in too many features before you've even validated the main one.
Choosing Your Development Path
One of the first big calls you'll have to make is how you're going to build your app. This decision will directly impact your budget, timeline, and how the app ultimately performs. There's no single right answer here; it all comes down to your specific resources and goals.
Let's break down the main ways you can go:
Native (Swift for iOS): This means writing code specifically for Apple's ecosystem. Native apps deliver the absolute best performance, top-tier security, and the smoothest user experience because they tap directly into device hardware like the camera or GPS. The tradeoff? It’s more expensive and time-consuming, especially if you plan to launch on Android later (that would require a completely separate app).
Cross-Platform (React Native, Flutter): Here, you write one set of code that works on both iOS and Android. This is a game-changer for speed and budget, cutting your development costs significantly. The catch is that performance might not feel quite as crisp as a native app, and you can sometimes run into headaches when trying to implement unique iOS or Android features.
Hybrid (Ionic, Cordova): Think of these as websites packaged inside a native app's shell. They are by far the fastest and cheapest to produce. However, they often come with noticeable performance lags and a user experience that doesn't feel quite "at home" on the device.
For an iOS-first launch where user experience is everything, going native with Swift is the gold standard. But if you’re crunched for time and money, a cross-platform solution is an incredibly practical way to get started.
You Can't Afford to Skip Testing
Before your app gets anywhere near the App Store, it needs to be put through the wringer. Seriously. A buggy, crash-prone app is the fastest way to get a tidal wave of 1-star reviews and sink your launch before it even starts. A proper testing plan is your insurance against that disaster.
This process isn't just a one-off check at the end; it's something that happens in a couple of key stages.
I see too many teams treat testing like a final exam. That’s a huge mistake. You need to build testing into your process from day one. Finding a bug early on is infinitely cheaper and easier to fix than finding it the day before you launch.
First up is alpha testing. This is your internal shakedown. Your own team and maybe a few trusted friends will try to break the app in every way imaginable. The goal is simple: find and squash all the major bugs, crashes, and glaring usability problems in a safe, controlled setting.
Once it's reasonably stable, you graduate to beta testing. This is where you release the app to a larger group of actual users from your target audience. You'll still find bugs, but the real gold here is feedback on the user experience. Is it intuitive? Do people understand the features? Does it actually solve their problem?
Tools like Apple's own TestFlight make it easy to get your beta version into people's hands and collect their thoughts. Pay close attention to the feedback you get. Look for patterns, points of confusion, and feature requests that align with your core vision. Since you're focused on iOS, it pays to understand the platform's specific challenges. Our guide on app testing for iOS walks you through building a quality assurance plan that works.
This cycle of testing, listening, and tweaking is what turns a good MVP into a great, launch-ready app. Prioritize the show-stopping bugs first, then tackle the most significant usability issues. This is how you build something people will actually love to use.
Creating Pre-Launch Marketing Buzz
Let’s get one thing straight: the "if you build it, they will come" mentality is a fantastic way to launch an app to the sound of crickets. A successful app launch isn't a surprise party. It's a highly anticipated event where the invitations went out months ago, and people are genuinely excited to show up.
Building that anticipation—that pre-launch buzz—is what separates a roaring start from a silent one. This whole process needs to kick off long before you’re even thinking about hitting "submit" on the App Store. The goal is to build a community around the problem your app solves, not just the product itself.
Establish a Strong Brand Identity
Before you write a single line of marketing copy, you need to know who you are. Your brand is way more than just a slick logo; it's the entire personality of your app. It’s the promise you make to your users. When you nail this, every other marketing decision becomes a whole lot easier.
Get the essentials right from the start:
- A Memorable Name: Can people say it, spell it, and remember it? Your app's name should hint at its function without being so generic it gets lost in the crowd.
- A Standout Icon: That tiny square is your app's face on a user's phone. It has to be simple, instantly recognizable, and look sharp at any size. Ditch the tiny text and overly complex designs.
- Clear Messaging: What’s the one core benefit? What problem do you solve? You need to be able to boil it down into a single, compelling sentence. This is the bedrock of your website copy, your social posts, and your app description.
Consistency is key. Your brand identity needs to be the same everywhere you have a presence. This creates a cohesive, professional impression that starts building trust before anyone has even downloaded your app.
Build Your Pre-Launch Hub
You need a central place to funnel all the interest you’re generating. The most effective tool for this is a simple pre-launch landing page. I'm not talking about a full-blown website—just a single page with one critical job to do.
Your landing page has one goal and one goal only: to capture the email address of someone genuinely interested in your app. Every word, every image, every design choice should serve that single purpose.
Keep it laser-focused:
- Headline: A punchy headline that screams your app's main benefit.
- Brief Description: Just 2-3 sentences explaining what problem you solve and who you solve it for.
- Visual: A clean mockup of your app or a graphic that captures your brand's vibe.
- The Ask: A clear call-to-action (CTA) like "Be the first to know" or "Get exclusive early access," paired with a dead-simple email signup form.
You don't need to be a developer to get this done. Services like Carrd or Webflow make it incredibly easy to spin up a professional-looking page in an afternoon. This email list is your golden ticket—it’s a direct line to your most enthusiastic future users and your built-in audience for launch day.
Prepare for the App Store Battlefield
Before you can win, you need to understand the field you’re playing on. The scale is staggering; by 2025, the global mobile app market is projected to hit around 299 billion downloads. You can’t just show up and hope for the best.
This is where App Store Optimization (ASO) comes in. ASO is how you get your app seen. Think of it as SEO, but specifically for the App Store. It’s the process of fine-tuning your app's listing to rank higher in search results and convince people to tap "Get."
Here are the core components you have to get right:
- App Title and Subtitle: These are prime real estate for search. Weave your most important keywords in here naturally. For example, "Scribe - AI Journal & Notes" is infinitely better than just "Scribe."
- Keyword Research: Get inside your target audience's head. What terms would they actually type into the search bar? Use tools to find keywords with decent traffic but lower competition.
- Compelling Screenshots and Video: Visuals are what sell the experience. Your screenshots shouldn't just be a random tour of features; they should tell a story about the benefit to the user. A short, snappy preview video can seriously boost your conversion rate.
Nailing these elements ensures that when people are actively looking for a solution like yours, they find you. For a deeper dive, check out our guide on app user acquisition strategies for more tactics to attract those crucial first users.
Executing a Flawless App Store Submission
So, you've built the app, hunted down the last of the bugs, and your beta testers are giving you the thumbs up. Now it's time to face the final gatekeeper: the App Store review process. This is where all your careful preparation pays off, turning what could be a nail-biting wait into a smooth final step.
Getting this part right is less about coding wizardry and more about meticulously following the rules. Both Apple and Google have incredibly detailed guidelines, and you'd be surprised how many rejections come from simple oversights, not catastrophic app failures. Think of it as preparing your app for a formal inspection where every single detail is under the microscope.
Assembling Your Submission Toolkit
Before you even dream of hitting that "Submit for Review" button, you need to get your assets in order. I always recommend creating a dedicated "Submission" folder on your desktop to hold everything. It's like a chef's mise en place—having everything prepped and ready saves a ton of last-minute panic.
You absolutely need to have these items ready to go:
- Final App Binary: This is the compiled, release-ready version of your app. Make sure it's built using the latest stable version of Xcode and the iOS SDK. No shortcuts here.
- App Icon: A crisp, high-resolution 1024x1024 pixel icon. It should be simple, clean, and instantly recognizable.
- App Store Screenshots: These aren't just pictures; they're your most powerful marketing tool. Don't just show off features. Craft a visual story that highlights the benefit to the user.
- Promotional Text and Description: This is your sales pitch. It needs to be compelling, weave in your ASO keywords naturally, and clearly explain what your app does and who it's for.
- Privacy Policy URL: This is a non-negotiable. Your app must link to a live, accessible privacy policy that details exactly how you handle user data.
- Contact Information: You'll need a support URL or a dedicated email address where users can find help.
Missing even one of these items can lead to an instant rejection, which means you're back to square one, and your launch timeline just got pushed back.
Dodging Common Rejection Pitfalls
App Store reviewers are the guardians of a high-quality ecosystem, and they have a very long checklist. While you can't predict everything they'll look for, you can steer clear of the most common traps that snag developers.
A huge percentage of rejections fall under Guideline 2.1 - App Completeness. This is Apple’s catch-all for apps that crash, have glaring bugs, or just feel unfinished. Your submission needs to feel polished and stable from the moment the reviewer opens it.
Here are the issues I see trip people up time and time again:
- Crashes and Bugs: This is the number one killer. Test your app relentlessly on different devices and iOS versions. A single crash during the review is almost always a dealbreaker.
- Inaccurate Metadata: Your App Store description must perfectly match your app's functionality. Promising features that don't exist or are locked behind a broken in-app purchase is a fast track to rejection.
- Broken Links: Every single link—from your support page to your privacy policy—has to work. A dead link signals a lack of polish and attention to detail.
- Placeholder Content: Submitting an app with "lorem ipsum" text or temporary images is a rookie mistake that screams "unfinished." It needs to look and feel like a final product.
- User Data and Privacy: If your app collects any user data, you have to be completely transparent. Clearly explain why you need access to things like location, contacts, or photos, and ensure your privacy policy is fully compliant.
Try to put yourself in the reviewer's shoes. They're seeing your app for the very first time with zero emotional investment. It simply has to work as advertised and play by the platform's rules. Nailing these details isn't just about avoiding rejection; it's a critical part of a professional app launch.
Driving Growth After Your App Goes Live
It’s easy to think of launch day as the finish line. After all the hard work, your app is finally out there. But the truth is, this is where the real race begins. The most successful apps aren't just launched; they're nurtured. They treat the launch as the start of a conversation with their users, not the end.
Now, your job shifts from building to listening. It's about creating a tight feedback loop: listen to your first users, measure how they actually use the app, and let those insights drive your marketing and your next update. This is how you build momentum that lasts.
Engage Your Early Adopters
The first people who download your app are gold. They took a chance on something new, and their initial impressions can make or break your trajectory. Connecting with them isn't just good customer service—it's the best market research you'll ever get.
Make it a personal mission to monitor your App Store reviews. Respond to all of them, especially the bad ones. I've seen a thoughtful reply to a 1-star review turn an angry user into a loyal fan. It shows you’re a real person who genuinely cares about fixing what’s broken.
Don't take negative feedback personally. View it as a free consultation from someone who cares enough about your app to tell you what's wrong. This is the raw material for your first, and most critical, update.
Gather everything you can—reviews, support tickets, social media comments—and start looking for patterns. Are five different people getting stuck on the same screen? Is a specific feature request popping up over and over? This is your roadmap for what to build next.
Track What Truly Matters
Your gut instinct got you this far, but now it's time to let data guide you. You need to know exactly how people are interacting with your app, and that means setting up analytics from day one. Don't get overwhelmed by measuring everything. Instead, focus on a few key metrics that tell you if people are actually getting value out of what you’ve built.
Right after launch, keep a close eye on these:
- User Retention Rate: What percentage of people come back a day, a week, or a month later? This is the ultimate sign of a "sticky" app.
- Session Length: Are people spending 30 seconds or 10 minutes in the app? This hints at how engaged they are.
- Feature Adoption: Which features are people really using? You might be surprised to find that a small, secondary feature is what people love most.
- Drop-off Points: Where are you losing people? Finding these friction points is the first step to fixing a leaky bucket.
Tools like Mixpanel or Amplitude are fantastic for this, but even Apple's built-in App Analytics provides a ton of useful information. This data helps you make smart decisions so you’re not wasting precious time and money on the wrong things.
Fuel the Fire with Ongoing Marketing
The initial launch buzz won't last forever. For sustainable growth, you need a marketing engine that keeps running, attracting new users while keeping your existing ones happy. This isn't about just throwing money at ads; it's about being strategic.
Take all that positive feedback you're getting and put it to work. Turn those glowing App Store reviews and happy tweets into testimonials for your website and ad copy. Nothing sells your app better than the words of a satisfied user.
As you move forward, a blend of different tactics usually works best. Targeted ads on social media can bring in new users quickly, but don't sleep on content marketing. Writing helpful blog posts or creating short videos that solve your target audience's problem can build long-term trust and attract the right kind of users. Once you have a bit of a following, reaching out to niche bloggers or journalists can also land you some powerful press.
To help you decide where to focus your energy, here's a quick comparison of some common post-launch tactics.
Post-Launch Growth Tactics Comparison
| Tactic | Primary Goal | Effort Level | Potential Impact |
|---|---|---|---|
| User Testimonials | Build social proof and trust with new users. | Low | High |
| Targeted Ads | Drive immediate, qualified downloads. | Medium | Medium-High |
| Content Marketing | Attract organic traffic and establish authority. | High | High (Long-term) |
| Media Outreach | Gain credibility and reach a wider audience. | Medium | High |
No single tactic is a silver bullet. The key is to combine direct engagement with your users, data-driven improvements, and consistent marketing. This creates a powerful cycle of growth that can turn a simple app launch into a long-term success story.
Common Questions About Launching an App
If you're gearing up for your first app launch, you've probably got a long list of questions. It's totally normal. Beyond the code and design, most founders I talk to are really wondering about the practical stuff: timelines, budgets, and how on earth to get people to actually download their app.
Getting straight answers is key. This isn't about finding a magic formula, but about setting realistic expectations for the journey ahead. Knowing what's coming helps you plan better, spend smarter, and sidestep those classic first-timer mistakes.
How Long Does It Really Take to Launch an App?
This is the big one, and the honest-to-goodness answer is: it depends. I’ve seen simple, focused utility apps go from idea to App Store in 3-4 months. On the other hand, a more ambitious app—think user profiles, a custom backend, and multiple API integrations—is more likely to be a 6-12 month project, sometimes longer.
So, what moves the needle? A few things really dictate your timeline:
- Feature Complexity: The more you try to cram into your Minimum Viable Product (MVP), the longer it's going to take. Seriously. A lean MVP that solves one problem exceptionally well will always beat a bloated one to market.
- Team and Talent: A seasoned team that has been through the App Store wringer before will work much faster than a solo founder trying to learn everything at once.
- Platform Choice: Sticking to a native iOS app is usually a more direct path. Building for both iOS and Android with a cross-platform framework can be great, but it often brings its own set of unique bugs and headaches for each OS that can stretch your schedule.
Don't forget, "development" is just one piece of the puzzle. You need to tack on time for user research, design mockups, quality assurance testing, and all your pre-launch marketing. That alone can easily add a couple of months.
What Is a Realistic Budget for an App Launch?
Costs can swing wildly. You might get a simple, no-frills app built by a freelancer for somewhere in the $5,000 - $15,000 ballpark. Step it up to a mid-complexity app with a polished UI and more robust features, and you’re likely looking at $25,000 to $75,000, often from a small agency.
For the big leagues—apps with custom backend architecture, intricate user flows, and ongoing support—budgets quickly climb past $100,000. The most important thing is to understand that the initial build cost is just the beginning. Your total budget needs to account for:
- Ongoing Maintenance: Think bug fixes, keeping up with new iOS updates, and server costs.
- Marketing and User Acquisition: You have to set aside money to tell people your app exists.
- Third-Party Services: That database, analytics tool, or API isn't always free.
Nailing down a clear budget from day one keeps you from getting carried away with "just one more feature" and makes sure you have the funds to support your app once it’s out in the wild.
How Do I Market an App with a Small Budget?
Good news: you don't need a Super Bowl ad budget to get noticed. Some of the most successful apps I've seen got their start with smart, scrappy marketing that was more about hustle than cash. The trick is to start early and stay consistent.
Instead of expensive ads, pour your energy into these high-impact, low-cost moves:
- Build in Public: Get on X (formerly Twitter), LinkedIn, or a relevant subreddit and share your journey. Document the highs and the lows. People love a good story, and it builds an audience of early fans who feel like they're part of it.
- Content Marketing: Write a blog, record short videos, or start a newsletter that actually helps people solve the problem your app addresses. You'll build authority and attract the right kind of users.
- App Store Optimization (ASO): Your App Store page is your most valuable piece of marketing real estate, and optimizing it is free. Spend real time on keyword research, crafting a killer description, and creating compelling screenshots.
- Get into Communities: Find the forums and online groups where your target users live. Don't just spam your link—become a valued member. Answer questions, offer advice, and build relationships. Then, when the time is right, you can introduce your app to a warm audience.
These grassroots efforts create a solid foundation and a loyal user base that will champion your app long after the launch-day confetti settles.
Ready to turn your app's monetization strategy into a high-performance engine? Nuxie gives you the power to design, target, and launch converting paywalls without waiting for app updates. Integrate our Swift SDK in minutes and start optimizing your revenue today.